This opens up A360 where I can see all my files stored in the Internet. I have created a folder called DT MZ where I keep my designs.
When I double-click on the folder called DT MZ I can see all my models and files.
The file I want to open is called 2Dto3D. On the far right of the Menu Bar there are some interesting options. One, you can choose to Open in Fusion 360 from here. Two, you can select various ways to Share your design. You can even download the model as well.
I will focus on the Share option this time.
There are three things you can do from here: Copy Link, Email or Embed.
The first two are very straight forward, just copy the link or send a direct email to a person. For my blog post I used Embed.
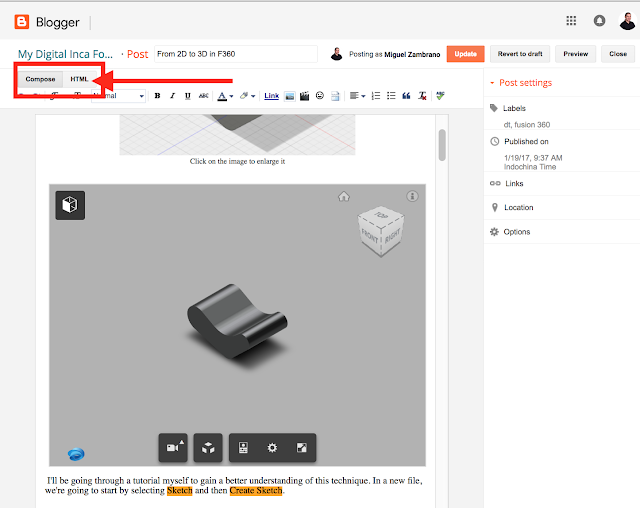
I clicked on the Copy button and then pasted the embed code in my blog. This is how I did this part. Since I am using Blogger, I opened the post to edit and changed the view from Compose to HTML.

Then I located a spot in the HTML code to place the embed code. You can recognize the iframe tag used to add this 3D window. Sorry, this is HTML (Hypertext Markup Language) jargon.
Finally, I click on the Update button of my blog post.
And when I view it, I can see a frame (window) that allows me to see, move, etc. this 3D model in various ways.
Now, let's talk about PowerSchool Learning's ePortfolio. This environment is pretty much the same as the one a teacher uses when creating content for a class.
Open your ePortfolio and using the DT CAD/CAM page click on "Add Content Block".
There are two ways you can do this. I will first use the Content Block called "Embed the Web".
You need to have the embed code already copied in the computer's memory. Paste the code in the window as shown below.
Before you end, you need to add a Block Title and click on "Save".
This looks good, the frame is centered in the Content Block.
Another way to add this embed code is by using the "On Page Text" Content Block.
Once the window opens, type a Block Title and switch to the "Source" option, because it is not just simple text that you want to insert but HTML code.
Paste the code and click on "Save".
Click on the "Source" button again to exit source mode.
What you will see now is an iframe box. To end click on "Save".
Note the difference between the Embed the Web and the On Page Text content blocks. In the second case, the iframe appears aligned to the left be default. It does not center the iframe like the "Embed the Web" content block.
To fix this, return to edit the On Page Text content block. Click on the iframe and align it to the center. Finally, click on the "Save" button.
In this example, you have learned how to add the embed code using two content blocks. You can choose any of them. The final product will still be pretty much the same.


No comments:
Post a Comment